Tutorial 1: Chat With Your Data
In this tutorial you’ll add a /chat page to your generated app where users ask natural-language questions about their data. An AI agent decides when to look up your DaaS collections and answers in natural language.
By the end you’ll have:
- A Chocolate Factory agent connected to your app’s live DaaS data via DaaS’s built-in MCP endpoint — no data-access code to write
- A
/chatpage using the Chocolate Factory chat widget - A working end-to-end demo against your own collections
- A DIY alternative below if you’d rather call AWS Bedrock directly from your own code
Prerequisites
- A generated app from the Developer Series — Your First App, running locally with
pnpm dev - At least one DaaS collection with data (see Tutorial 2: Collections & Data)
- Chocolate Factory connected to your project
Create a read-only DaaS user for the agent
The agent only needs to read your data, never write it. Tell your coding assistant:
Create a DaaS role and user scoped to read-only access on my
<your-collection> collection — no create, update, or delete
permissions. Generate a static token for that user so an external
service can authenticate as it.
This is the same DaaS role/permission system covered in Tutorial 4: Role-Based Access — nothing Chocolate Factory–specific here, just a scoped-down user for the agent to authenticate as.
Keep this user read-only rather than relying on Chocolate Factory to restrict it. DaaS enforces the permission at the database layer, so even if the agent’s prompt is manipulated into attempting a write, the request is rejected.
Register DaaS as an MCP server
DaaS exposes its data through a built-in MCP endpoint at /api/mcp — Chocolate Factory can talk to it directly, no wrapper needed.
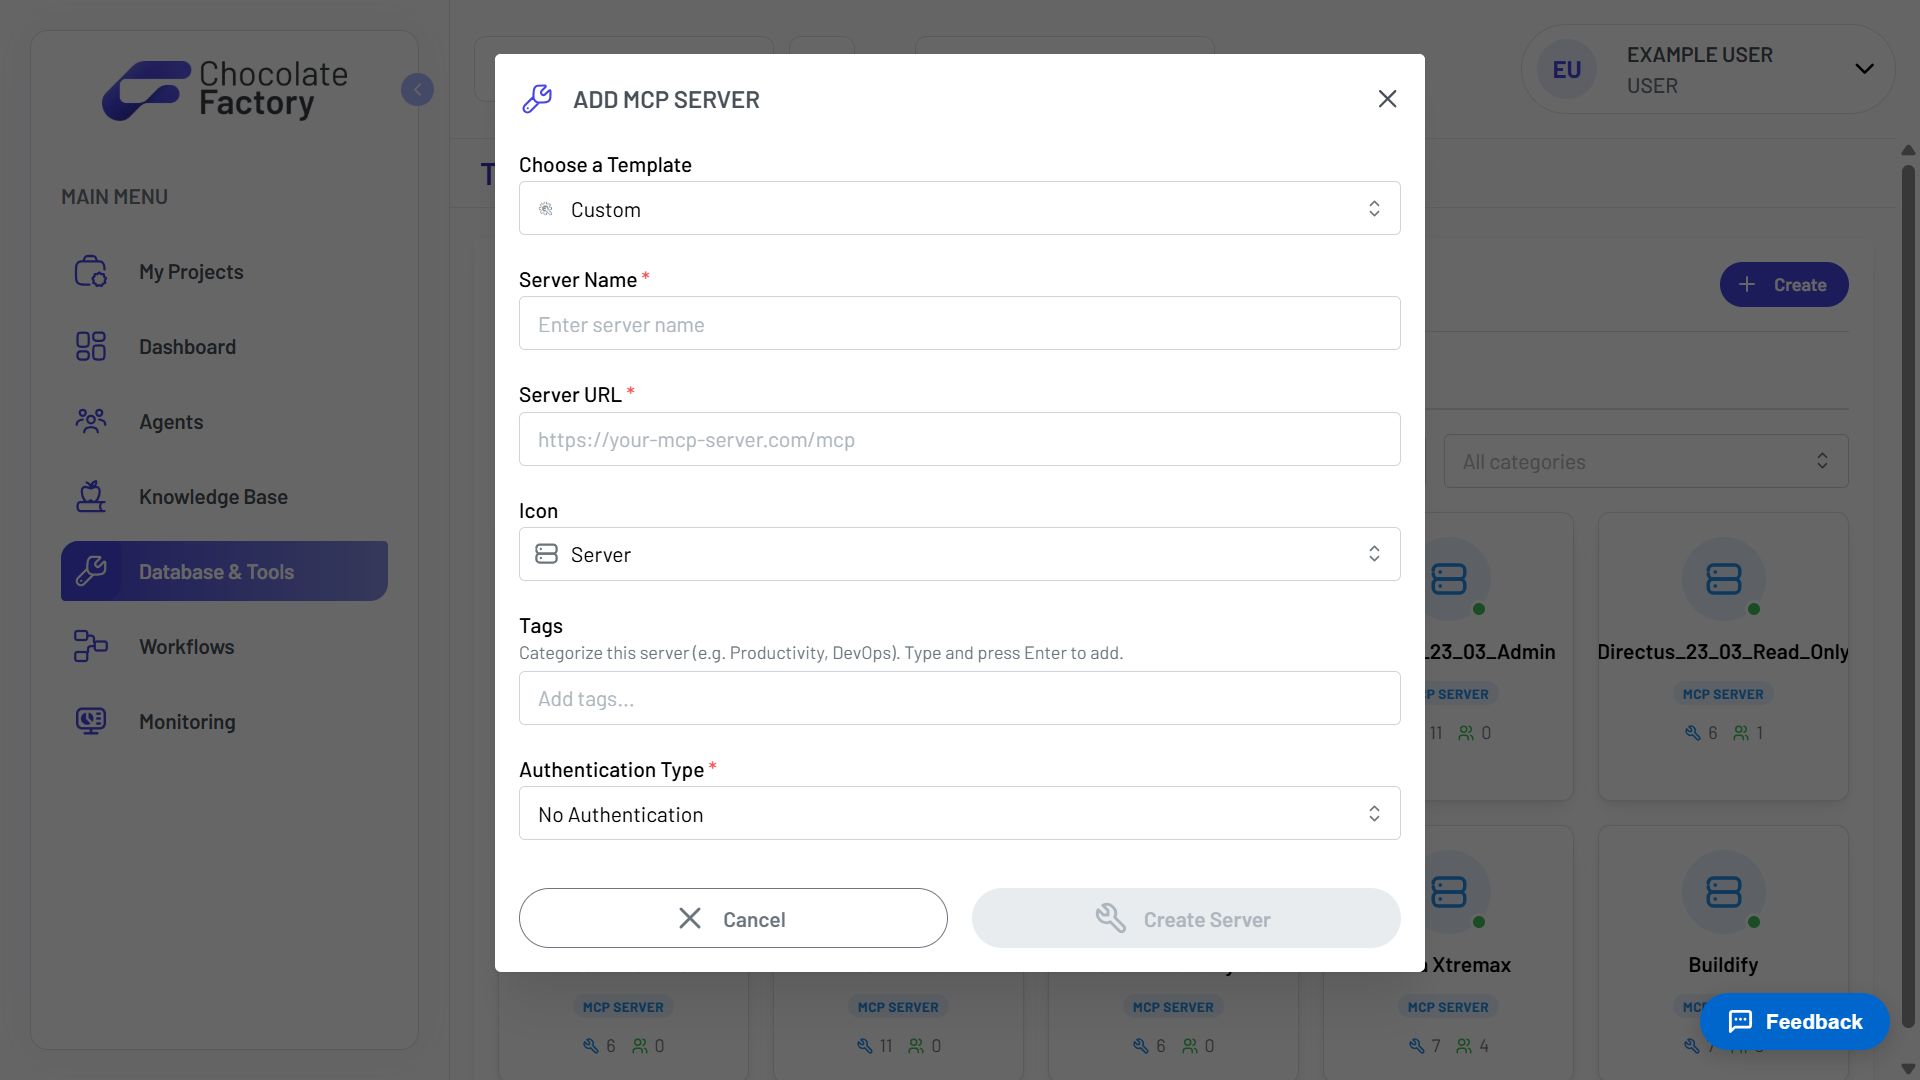
- In the Chocolate Factory Portal, open Tools → MCP Servers → Add MCP Server.
- Choose Custom.
- Server Name — something like “My App Data.”
- Server URL — your app’s DaaS URL with
/api/mcpappended, e.g.https://your-daas-domain.com/api/mcp. - Authentication — API Key, and paste the static token from the previous step.
- Click Create. Chocolate Factory runs a health check and syncs the available tools (
schema,items, and others your token has access to).
Create the agent
Open Agents → Create Agent in the Portal — see Agent Configuration if you haven’t created one before. Give it a name and pick any tool-calling-capable model.
Set the system prompt:
You are an assistant embedded in a Buildpad app. Use the `schema`
tool to see what collections and fields exist before answering.
Use the `items` tool (action: read) to fetch data and answer the
user's question. Only answer using data you retrieved — never
make up values. You do not have write access, so don't attempt to
create, update, or delete anything.
Attach the MCP server to the agent
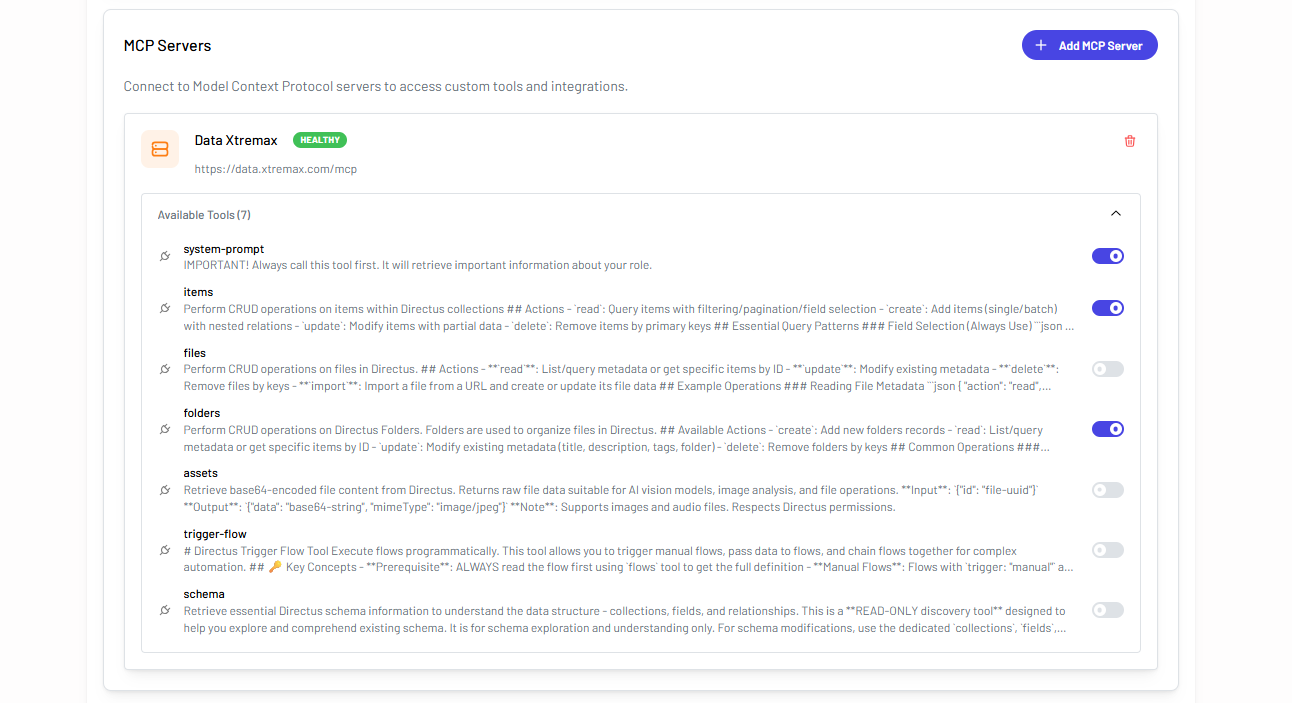
- On the agent’s Tools tab, scroll to MCP Servers and click Add MCP Server.
- Pick the server you just registered.
- Expand Available Tools and enable
schemaanditems. Leave admin-only tools (collections,fields,roles, etc.) off — your read-only token can’t use them anyway. - Save the agent.
Test it in the Portal first
Before wiring anything into your app, open the Chocolate Factory dashboard’s chat, select your agent, and ask “What collections do I have?”. Confirm it calls schema, then items, and answers from real data — cheaper to catch a bad system prompt here than after it’s embedded in your app.
Add the chat widget to your app
Follow Example 1 in the Chocolate Factory playbook to drop in the pre-built chat widget with your agent’s ID — it handles streaming, message history, and tool-call visibility for you. Prefer a custom-built page instead of the widget? See Example 3 in the same playbook for using the SDK’s ChatClient directly.
Verify It Works
Open the page with the widget
Confirm the chat widget renders with no console errors about a missing agent ID.
Ask what data exists
Type “What collections do I have?” — expect a reply listing your collections and fields, with a visible schema tool call.
Query a collection
Type “Show me the 5 most recent rows in <your-collection>.” — expect a visible items tool call followed by a natural-language summary of the results.
If the agent can’t see your data, re-check the MCP server’s health status on the Tools page, and confirm the static token’s DaaS role actually has read access to the collection you’re asking about.
Once this is live, every conversation shows up in Chocolate Factory’s Observability view — useful for checking exactly what the agent queried if an answer looks wrong.
DIY Alternative: Build It Yourself on AWS Bedrock
Prefer to call the model directly instead of using Chocolate Factory? This covers the same /chat page, built by hand on AWS Bedrock and the Vercel AI SDK.
Prerequisites
- A generated app from the Developer Series — Your First App, running locally with
pnpm dev - At least one DaaS collection with data (see Tutorial 2: Collections & Data)
- An AWS account with Bedrock enabled — follow Bedrock getting started to set up your account
- A Bedrock API key (Bearer token) — see Bedrock API keys
This path adds a new /api/chat route inside your generated app — you own and run the model calls yourself.
Enable a Bedrock model in your region
In the AWS console, open Bedrock → Model access and request access to Amazon Nova Lite — a fast, cheap model that’s great for tool-calling. Use the cross-region inference profile that matches the region you’ll call from:
| Region | Suggested model id |
|---|---|
us-east-1, us-west-2 | us.amazon.nova-lite-v1:0 |
eu-* | eu.amazon.nova-lite-v1:0 |
ap-southeast-1, ap-southeast-2, ap-northeast-1 | apac.amazon.nova-lite-v1:0 |
After granting model access, also confirm the inference profile is enabled for your account under Bedrock → Cross-region inference. If it isn’t, your first request returns a 403.
Generate a Bedrock API key in the console (Bedrock → API keys) and add the following to your app’s .env.local:
AWS_REGION=ap-southeast-1
AWS_BEARER_TOKEN_BEDROCK=bedrock-api-key-xxxx
BEDROCK_MODEL_ID=apac.amazon.nova-lite-v1:0
Confirm dependencies are present
The Buildpad starter already ships with everything you need:
ai+@ai-sdk/amazon-bedrock— server-side streaming and the Bedrock provider@ai-sdk/react— theuseChathook for the clientzod— input schemas for tool definitions@mantine/core+@tabler/icons-react— the UI primitives you’ll build the chat page with
Verify them with:
pnpm list ai @ai-sdk/amazon-bedrock @ai-sdk/react zod @mantine/coreIf any are missing, install them:
pnpm add ai @ai-sdk/amazon-bedrock @ai-sdk/react zodCreate the chat API route
Create app/api/chat/route.ts in your app:
import { bedrock } from "@ai-sdk/amazon-bedrock";
import { convertToModelMessages, stepCountIs, streamText } from "ai";
import { dataTools } from "./tools";

export const runtime = "nodejs";
export const maxDuration = 60;

export async function POST(req: Request) {
  const { messages } = await req.json();

  const result = streamText({
    model: bedrock(process.env.BEDROCK_MODEL_ID!),
    system:
      "You are an assistant embedded in a Buildpad app. " +
      "Use the provided tools to answer questions about the user's collections. " +
      "Always call list_collections first if you don't already know what data exists.",
    messages: await convertToModelMessages(messages),
    tools: dataTools,
    stopWhen: stepCountIs(5),
  });

  return result.toUIMessageStreamResponse();
}
stopWhen: stepCountIs(5) lets the model chain tool calls (e.g. discover collections, then query one) within a single user turn. convertToModelMessages (async — note the await) converts the UI-shaped messages from useChat into the model-shaped messages streamText expects.
Define the data-access tools
Create app/api/chat/tools.ts:
import { tool } from "ai";
import { z } from "zod";
import { getAuthHeaders, getDaasUrl } from "@/lib/api/auth-headers";

async function daas(path: string) {
  const url = `${getDaasUrl()}${path}`;
  const headers = await getAuthHeaders();
  const res = await fetch(url, { headers, cache: "no-store" });
  if (!res.ok) throw new Error(`DaaS ${res.status}: ${await res.text()}`);
  return res.json();
}

export const dataTools = {
  list_collections: tool({
    description:
      "List all available collections in this app, with their field names and types.",
    inputSchema: z.object({}),
    execute: async () => {
      const [{ data: collections }, { data: fields }] = await Promise.all([
        daas("/api/collections"),
        daas("/api/fields"),
      ]);
      return (collections as any[]).map((c: any) => ({
        collection: c.collection,
        fields: (fields as any[])
          .filter((f: any) => f.collection === c.collection)
          .map((f: any) => ({ field: f.field, type: f.type })),
      }));
    },
  }),

  query_collection: tool({
    description:
      "Fetch rows from a collection. Use this after list_collections to answer questions about the user's data.",
    inputSchema: z.object({
      collection: z.string().describe("The collection slug, e.g. 'tasks'."),
      limit: z.number().int().min(1).max(50).default(10),
      sort: z
        .string()
        .optional()
        .describe("Field to sort by. Prefix with '-' for descending."),
    }),
    execute: async ({ collection, limit, sort }) => {
      const params = new URLSearchParams({ limit: String(limit) });
      if (sort) params.set("sort", sort);
      const { data } = await daas(`/api/items/${collection}?${params}`);
      return data;
    },
  }),
};
Two things to call out:
inputSchema:is the v6 name (older docs you might find online sayparameters:— those are pre-v5)getAuthHeaders/getDaasUrlcome from the Buildpad starter at lib/api/auth-headers.ts. They reuse the Supabase session JWT, so every tool call respects the calling user’s DaaS permissions via RBAC — no extra service tokens to manage.
These two tools cover the common case. The full DaaS operation set — filtering, relations, schema introspection, writes — is documented in the MCP tool reference . Add more tool({...}) entries here as your app grows.
Build the chat page
Create app/(authenticated)/chat/page.tsx using Mantine primitives:
"use client";

import {
  Box,
  Button,
  Code,
  Group,
  Paper,
  ScrollArea,
  Stack,
  Text,
  Textarea,
  Title,
} from "@mantine/core";
import { useChat } from "@ai-sdk/react";
import { useState } from "react";

export default function ChatPage() {
  const { messages, sendMessage, status } = useChat();
  const [input, setInput] = useState("");

  const handleSubmit = (e: React.FormEvent) => {
    e.preventDefault();
    if (!input.trim() || status !== "ready") return;
    sendMessage({ text: input });
    setInput("");
  };

  return (
    <Stack h="calc(100vh - 4rem)" gap="md" p="md" maw={800} mx="auto">
      <Title order={3}>Chat with your data</Title>

      <ScrollArea style={{ flex: 1 }} type="auto">
        <Stack gap="md">
          {messages.map((m) => (
            <Paper key={m.id} p="sm" withBorder radius="md">
              <Text
                fw={600}
                size="sm"
                mb={4}
                c={m.role === "user" ? "blue" : "grape"}
              >
                {m.role === "user" ? "You" : "Assistant"}
              </Text>
              <Stack gap="xs">
                {m.parts.map((part, i) => {
                  if (part.type === "text") {
                    return (
                      <Text key={i} style={{ whiteSpace: "pre-wrap" }}>
                        {part.text}
                      </Text>
                    );
                  }
                  if (part.type.startsWith("tool-")) {
                    const p = part as any;
                    return (
                      <Box key={i}>
                        <Text size="xs" c="dimmed" mb={4}>
                          {p.type.replace("tool-", "")} — {p.state}
                        </Text>
                        {p.output !== undefined && (
                          <Code
                            block
                            style={{ maxHeight: 240, overflow: "auto" }}
                          >
                            {JSON.stringify(p.output, null, 2)}
                          </Code>
                        )}
                      </Box>
                    );
                  }
                  return null;
                })}
              </Stack>
            </Paper>
          ))}
        </Stack>
      </ScrollArea>

      <form onSubmit={handleSubmit}>
        <Group align="flex-end" gap="sm">
          <Textarea
            value={input}
            onChange={(e) => setInput(e.currentTarget.value)}
            placeholder="Ask about your data…"
            autosize
            minRows={1}
            maxRows={6}
            style={{ flex: 1 }}
            disabled={status !== "ready"}
          />
          <Button type="submit" disabled={status !== "ready" || !input.trim()}>
            Send
          </Button>
        </Group>
      </form>
    </Stack>
  );
}
What’s happening:
useChat()(noapiargument) uses the default transport, which posts to/api/chatmessages[i].partsis an array of typed parts —type: "text"for streamed text,type: "tool-<toolName>"for tool invocations withstate("input-streaming" | "input-available" | "output-available" | "output-error") andoutputsendMessage({ text })is the v6 replacement for the oldhandleSubmit+ managedinputAPI
Placing the page under (authenticated) ensures it inherits DaaSProviderWrapper from the starter’s app/(authenticated)/layout.tsx. The DaaS token used by the tools lives server-side and is never sent to the browser.
Link to the page
Add a link to /chat from your existing authenticated landing page — for example, in app/(authenticated)/page.tsx, drop in a Mantine <Anchor component={Link} href="/chat">Open chat</Anchor>. Match whatever nav pattern your generated app already uses.
Verify It Works
With pnpm dev running:
Open the chat page
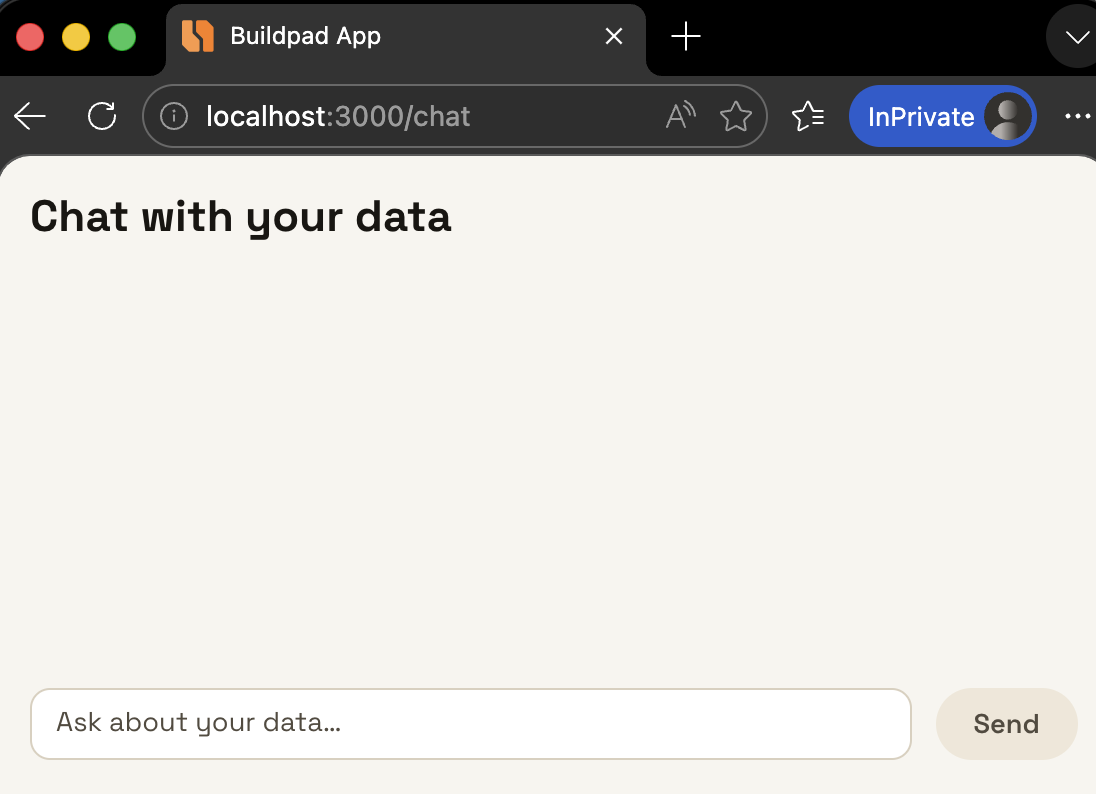
Navigate to http://localhost:3000/chat. You should see an empty conversation with a prompt input at the bottom.
Ask what data exists
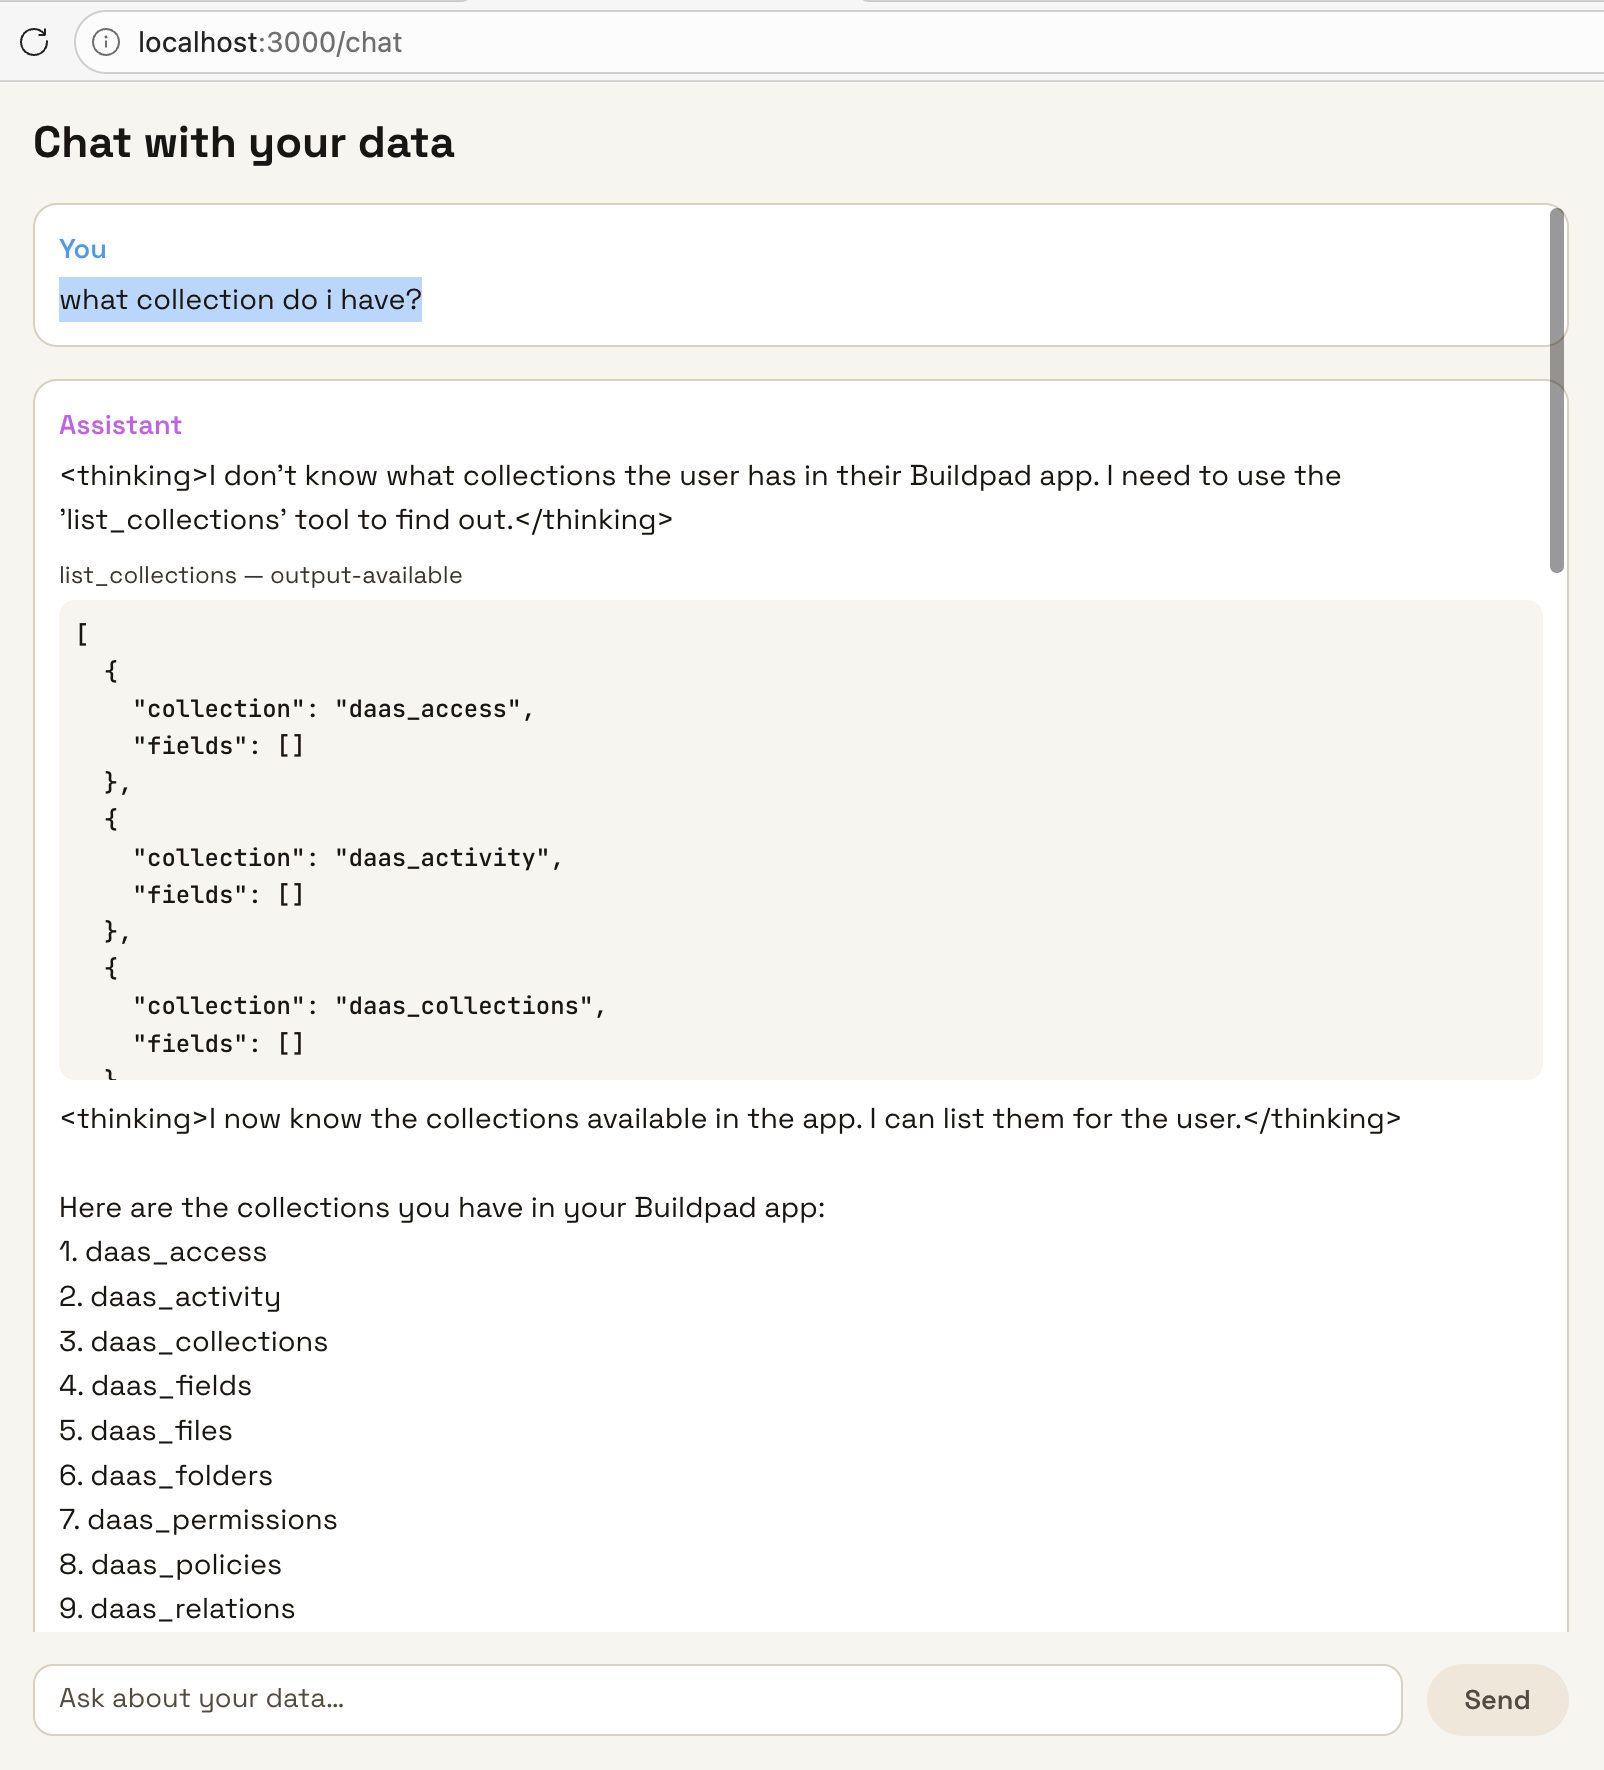
Type “What collections do I have?” and submit. Expected:
- The assistant’s first turn calls
list_collections(rendered in a tool panel under the message) - A streamed reply lists the collections with their fields
Query a collection
Type “Show me the 5 most recent rows in <your-collection>.” Expected:
- The assistant calls
query_collectionwithlimit: 5and a-prefixedsorton a timestamp field - The tool output panel shows the JSON returned by your DaaS instance
- The streamed reply summarises the rows in natural language
If a tool call errors with a 401, make sure you’re signed in to the app (the tools use your Supabase session JWT) and that BUILDPAD_DAAS_URL (or NEXT_PUBLIC_BUILDPAD_DAAS_URL) is set in .env.local. If Bedrock returns a 403, re-check that the inference profile for BEDROCK_MODEL_ID is enabled under Bedrock → Cross-region inference in your account.
This is a manual UI verification — adding Playwright coverage for streamed chat responses is left as a follow-up. The same pattern as Tutorial 8: Event Hooks & Extensions applies if you want to add it now.
What’s Next
Your app now has a chat surface backed by real data. Continue the series to add more AI features:
- Tutorial 2: AI-Assisted Form Fill — let users describe what they want to create in plain English; the agent drafts the form fields and the user reviews before saving
- Tutorial 3: AI Summaries & Reports — add a Generate Summary button that fetches live collection data and streams a formatted report into a Mantine card