Tutorial 2: AI-Assisted Form Fill
In this tutorial you’ll add a Fill with AI button to a form in your generated app. The user describes what they want to create in plain English — for example, “A task called Fix login bug, high priority, due next Friday” — and an agent drafts the field values. The user reviews the prefilled form and submits directly to DaaS. The agent never writes to the database — it only drafts, your existing form UI does the saving.
By the end you’ll have:
- A Chocolate Factory agent that drafts field values from a plain-English description, with no write access to your data
- A
/tasks/newpage with an AI fill panel built on top of your existing Mantine components - End-to-end flow: describe → agent drafts → user reviews → saves
- A DIY alternative below if you’d rather build the drafting tool yourself on AWS Bedrock
Prerequisites
- Tutorial 1: Chat With Your Data completed — you’ll reuse the DaaS MCP server registration from that tutorial
- A
taskscollection in DaaS with at leasttitle,priority, anddue_datefields
Create a dedicated form-fill agent
Reuse the read-only DaaS MCP server you registered in Tutorial 1, but give this agent its own system prompt focused on drafting, not answering questions. Open Agents → Create Agent in the Portal (see Agent Configuration), then on its Tools tab, attach the same MCP server and enable the schema tool.
Set the system prompt:
You draft field values for a new record based on a plain-English
description. Call `schema` to see the target collection's fields
before drafting. Respond with ONLY a JSON object in the shape
{ "fields": { ... } } using the exact field names from `schema` —
never invent a field name. Format date values as YYYY-MM-DD.

You do not have write access. Never attempt to create, update, or
delete anything — the user reviews and saves the record themselves.
This agent only needs schema, not items — it’s drafting a new record from scratch, not reading existing ones. Leaving items disabled on this agent is one more layer of “it physically cannot write,” on top of the DaaS role from Tutorial 1 already being read-only.
Wire it into your form
Tell your coding assistant:
Add a "Fill with AI" button to my task form.

Agent ID: [paste your form-fill agent's ID]
(configured to draft task field values as JSON from a plain-English
description — see the system prompt in the Portal)

When clicked:
- Send the user's typed description to the agent
- Parse the JSON response's `fields` object into the form's state
- Let the user review and edit the prefilled form before saving —
  don't auto-save
- Handle the case where the agent doesn't return valid JSON

Keep my existing form fields and Save button exactly as they are —
only the "how do the fields get filled in" part should change.
This is the same structured-output pattern as calling any Chocolate Factory agent for JSON instead of chat text — no tool-calling loop to write, no tools.ts file, no separate save-tool to keep from accidentally firing.
Verify It Works
Open the form
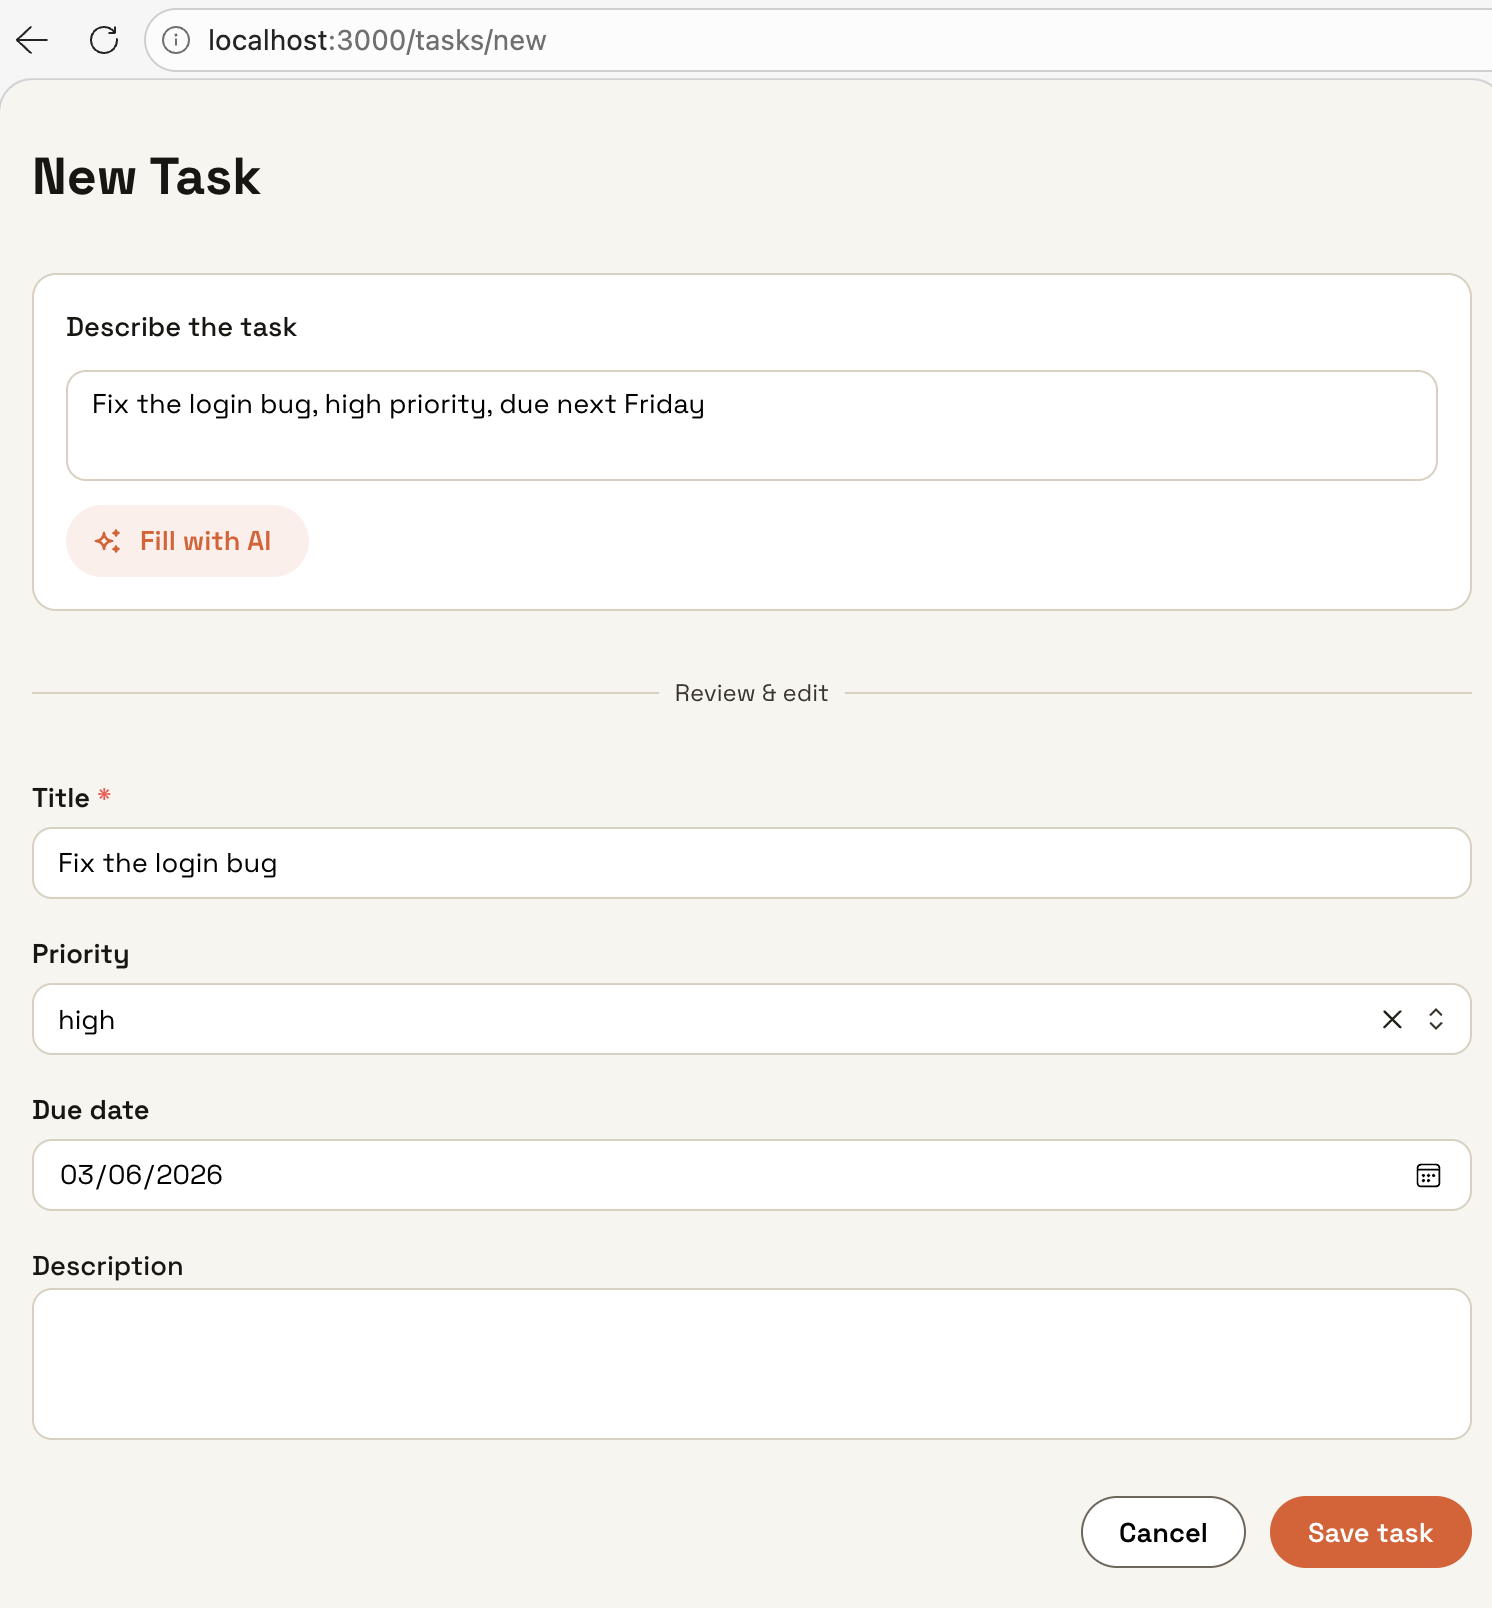
Navigate to your task form. You should see the description panel above the (empty) fields.
Describe a task
Type “Fix the login bug, high priority, due next Friday” and click Fill with AI.
Confirm the draft, not a save
The form fields should populate with suggested values — title, priority, and a resolved due date. Nothing should be saved yet; check /tasks if you want to confirm nothing new appeared there.
Review, edit, and save
Edit any field, then click Save task. Confirm the record now appears in /tasks with your edits, not just the AI’s first draft.
If fields don’t populate, confirm the agent is actually returning JSON — check its conversation in Execution Logs to see the raw response your app tried to parse.
DIY Alternative: Build It Yourself on AWS Bedrock
Prefer to write the drafting tool yourself instead of using Chocolate Factory? This continues from Tutorial 1’s DIY path — you’ll need its /api/chat route and tools.ts in place first.
Prerequisites
- Tutorial 1’s DIY path completed:
/api/chatroute andtools.tsare in place - A
taskscollection in DaaS with at leasttitle,priority, anddue_datefields
Add the draft_item tool
Open app/api/chat/tools.ts and add a draft_item tool below the existing ones. This tool lets the model return structured field suggestions without calling the DaaS API — the user is always the one who decides to save.
// app/api/chat/tools.ts

draft_item: tool({
  description:
    "Prepare field values for a new item based on the user's description. Return the suggested values — do NOT save to the database.",
  inputSchema: z.object({
    collection: z.string().describe("The collection slug, e.g. 'tasks'."),
    fields: z
      .record(z.string(), z.unknown())
      .describe("Key-value pairs mapping field names to suggested values."),
  }),
  execute: async ({ collection, fields }) => {
    // No DaaS call — just returns the draft so the UI can populate the form
    return { collection, fields, status: "draft" };
  },
}),
Only use field names returned by list_collections. Add a reminder in the system prompt so the model doesn’t invent field names.
Update the system prompt
Extend the system prompt in app/api/chat/route.ts so the model knows to call list_collections first, then draft_item:
// app/api/chat/route.ts  — inside the POST handler, before streamText
const today = new Date().toISOString().slice(0, 10);

// …then pass this as the system string:
system: `You are an assistant embedded in a Buildpad app. Today is ${today}.

When helping a user fill a form:
1. Call list_collections to discover the collection's fields and their types.
2. Call draft_item with your best interpretation of the user's description, using only the field names you found in step 1.
3. After calling draft_item, briefly summarise what you filled in and invite the user to review.

Format all date values as YYYY-MM-DD (e.g. ${today}). Never invent field names. Never call create or write operations — the user will save the form themselves.`,
Including today’s date lets the model resolve relative expressions like “next Friday” to an absolute calendar date. The YYYY-MM-DD format instruction ensures the value is compatible with the HTML type="date" input — without it, some models return a full ISO timestamp that the input silently ignores.
Create the save server action
The form’s Save button needs to write to DaaS using the Supabase session JWT. Create a server action so the auth headers stay server-side:
// app/(authenticated)/tasks/new/actions.ts
"use server";

import { getAuthHeaders, getDaasUrl } from "@/lib/api/auth-headers";

export async function createTaskAction(data: Record<string, unknown>) {
  const url = `${getDaasUrl()}/api/items/tasks`;
  const headers = await getAuthHeaders();
  const res = await fetch(url, {
    method: "POST",
    headers: { ...headers, "Content-Type": "application/json" },
    body: JSON.stringify(data),
    cache: "no-store",
  });
  if (!res.ok) throw new Error(`DaaS ${res.status}: ${await res.text()}`);
  return res.json();
}
Build the form page
Create app/(authenticated)/tasks/new/page.tsx. The page has two panels: an AI description panel on top and the editable form below. When the AI calls draft_item, the onFinish callback reads the tool result and populates the form state.
// app/(authenticated)/tasks/new/page.tsx
"use client";

import { useState } from "react";
import { useChat } from "@ai-sdk/react";
import {
  Button,
  Divider,
  Group,
  Paper,
  Select,
  Stack,
  Text,
  Textarea,
  TextInput,
  Title,
} from "@mantine/core";
import { IconSparkles } from "@tabler/icons-react";
import { useRouter } from "next/navigation";
import { createTaskAction } from "./actions";

interface TaskFields {
  title?: string;
  priority?: string;
  due_date?: string;
  description?: string;
}

export default function NewTaskPage() {
  const router = useRouter();
  const [prompt, setPrompt] = useState("");
  const [fields, setFields] = useState<TaskFields>({});
  const [saving, setSaving] = useState(false);

  const { sendMessage, status } = useChat({
    // No `api` option — useChat posts to /api/chat by default
    onFinish: ({ message }) => {
      // Find the draft_item tool output in the completed message.
      // In ai v6 a tool part has type `tool-<toolName>` and its result
      // lives in `output` once `state === "output-available"`.
      const draftPart = message.parts?.find(
        (p) =>
          p.type === "tool-draft_item" &&
          (p as any).state === "output-available"
      ) as any | undefined;

      if (draftPart?.output?.fields) {
        const raw = draftPart.output.fields as TaskFields;
        // Normalize any date string to YYYY-MM-DD for the HTML date input
        if (raw.due_date) {
          const d = new Date(raw.due_date);
          if (!isNaN(d.getTime())) raw.due_date = d.toISOString().slice(0, 10);
        }
        setFields((prev) => ({ ...prev, ...raw }));
      }
    },
  });

  const handleFillWithAI = () => {
    if (!prompt.trim()) return;
    sendMessage({
      text: `Fill a new task form based on this: "${prompt}". The collection is "tasks".`,
    });
  };

  const handleSave = async () => {
    setSaving(true);
    try {
      await createTaskAction(fields);
      router.push("/tasks");
    } finally {
      setSaving(false);
    }
  };

  const isFilling = status === "streaming" || status === "submitted";

  return (
    <Stack gap="xl" maw={720} mx="auto" py="xl">
      <Title order={2}>New Task</Title>

      {/* AI Fill Panel */}
      <Paper withBorder p="md" radius="md">
        <Stack gap="sm">
          <Text fw={500} size="sm">
            Describe the task
          </Text>
          <Textarea
            placeholder='e.g. "Fix the login bug, high priority, due next Friday"'
            value={prompt}
            onChange={(e) => setPrompt(e.currentTarget.value)}
            rows={2}
            onKeyDown={(e) => {
              if (e.key === "Enter" && !e.shiftKey) {
                e.preventDefault();
                handleFillWithAI();
              }
            }}
          />
          <Button
            leftSection={<IconSparkles size={16} />}
            loading={isFilling}
            onClick={handleFillWithAI}
            variant="light"
            w="fit-content"
          >
            Fill with AI
          </Button>
        </Stack>
      </Paper>

      <Divider label="Review & edit" labelPosition="center" />

      {/* Form */}
      <Stack gap="md">
        <TextInput
          label="Title"
          placeholder="Task title"
          value={fields.title ?? ""}
          onChange={(e) => setFields((f) => ({ ...f, title: e.currentTarget.value }))}
          required
        />
        <Select
          label="Priority"
          data={["low", "medium", "high"]}
          value={fields.priority ?? null}
          onChange={(v) => setFields((f) => ({ ...f, priority: v ?? undefined }))}
          clearable
        />
        <TextInput
          label="Due date"
          type="date"
          value={fields.due_date ?? ""}
          onChange={(e) => setFields((f) => ({ ...f, due_date: e.currentTarget.value }))}
        />
        <Textarea
          label="Description"
          value={fields.description ?? ""}
          onChange={(e) => setFields((f) => ({ ...f, description: e.currentTarget.value }))}
          rows={3}
        />
        <Group justify="flex-end" mt="sm">
          <Button variant="default" onClick={() => router.back()}>
            Cancel
          </Button>
          <Button
            onClick={handleSave}
            loading={saving}
            disabled={!fields.title?.trim()}
          >
            Save task
          </Button>
        </Group>
      </Stack>
    </Stack>
  );
}
Verify it works
- Navigate to
http://localhost:3000/tasks/new - Type a description: “Fix the login bug, high priority, due next Friday”
- Click Fill with AI (or press Enter)
- The assistant calls
list_collectionsthendraft_item— watch the status indicator while it streams - Form fields populate with the suggested values
- Edit any field, then click Save task
- You are redirected to
/taskswith the new record visible in the list
Troubleshooting
| Symptom | Fix |
|---|---|
| Fields don’t populate after AI responds | Log message.parts in onFinish — confirm a tool-draft_item part with state: "output-available" is present, and read its output (not result) |
| Model invents field names | Ensure list_collections is being called first; tighten the system prompt to say “only use field names from list_collections” |
| 401 on Save | The user must be signed in — getAuthHeaders() pulls from the active Supabase session |
| Due date field stays empty | The model returned a non-YYYY-MM-DD date string. Ensure the system prompt includes today’s date and the YYYY-MM-DD instruction — the onFinish normalization handles any remaining format variance |
What’s Next
- Extend to other collections by reusing the same agent with a different collection name in the prompt, or creating one per collection
- Add an Edit with AI button on existing record pages, following the same draft-then-review pattern
- Continue to Tutorial 3: AI Summaries & Reports to generate natural-language reports from your live collection data