Claude Code
Set up Claude Code to start AI-ready development with your Buildpad.ai project. Your AI agent connects directly to your backend so it can understand your data, generate code, and follow your project’s conventions.
Download a ready-to-use starter project for Claude Code. It includes your project credentials and backend connections so your AI agent can access your data and build with your project’s conventions from the start.
Prerequisites
- Claude Code installed on your machine — either the desktop app (no terminal required) or the CLI / IDE extension. Both run the same engine and share configuration, so the starter works identically in either.
- A Buildpad.ai project with a running environment.
Download the Starter Project
From your project’s Details page in Buildpad.ai, find the AI IDE Setup section and click Download Starter under the Claude Code card.
The download contains a ready-to-use project with agent instructions, agent skills, subagents, and backend connections — everything Claude Code needs to understand your project and start coding.
Explore the Project Structure
The starter project is generated with a root CLAUDE.md, a .claude/ directory, and a project-scoped .mcp.json:
- CLAUDE.md
- .mcp.json
Key components:
CLAUDE.md— Core rules and guidelines that Claude Code follows when assisting with your project. Claude Code treats this file as project memory and loads it automatically into every session..claude/skills/— Skills are reusable instruction packages that follow the open Agent Skills standard. Invoke them as slash commands (type/to browse) or let Claude Code activate them automatically when your request matches what a skill does. 57 skills are included, covering the spec-driven development workflow (/buildpad-spec-*), creating API routes, generating tests, scaffolding features, managing access control, and more..claude/agents/— Subagents that run focused work in their own isolated context. Claude Code delegates to them automatically by theirdescription— hand a finished slice tocode-reviewer, coverage work totest-engineer, or auth/security checks tosecurity-auditor, and run independent tasks in parallel..mcp.json— MCP (Model Context Protocol) is an open standard that lets AI assistants connect to external tools and data sources. This project-scoped config connects Claude Code to the Buildpad component library, your live DaaS backend, and the Buildpad platform.
Connect to Backend Services
The .mcp.json file at the project root connects Claude Code to three backend services:
- buildpad — Gives the agent access to the Buildpad UI component library, API patterns, and platform conventions so it can write code that follows your project’s standards.
- daas — Connects the agent to your project’s live backend, giving it direct access to your database collections, schemas, and runtime environment for accurate code generation.
- buildpad-platform — Connects the agent to the Buildpad platform, giving it access to your full project context: organization, project configuration, microapps, and environment URLs.
{
  "mcpServers": {
    "buildpad": {
      "command": "npx",
      "args": ["-y", "@buildpad/mcp@latest"]
    },
    "daas": {
      "type": "http",
      "url": "https://<your-project-id>.daas.buildpad.ai/api/mcp",
      "headers": {
        "Authorization": "Bearer <your-daas-token>"
      }
    },
    "buildpad-platform": {
      "type": "http",
      "url": "https://app.buildpad.ai/api/tools/mcp",
      "headers": {
        "Authorization": "Bearer <your-mcp-token>"
      }
    }
  }
}Your credentials are pre-filled — When you download the starter from the platform, your project’s backend URL and access token are filled in automatically. No manual configuration needed!
Open the Project and Approve the Backend Connections
For security, Claude Code asks for approval before using project-scoped servers from .mcp.json. How you open the project depends on which version you use — the desktop app and the CLI share the same configuration (CLAUDE.md, MCP servers, skills, and settings), so everything below applies to both.
Desktop app:
-
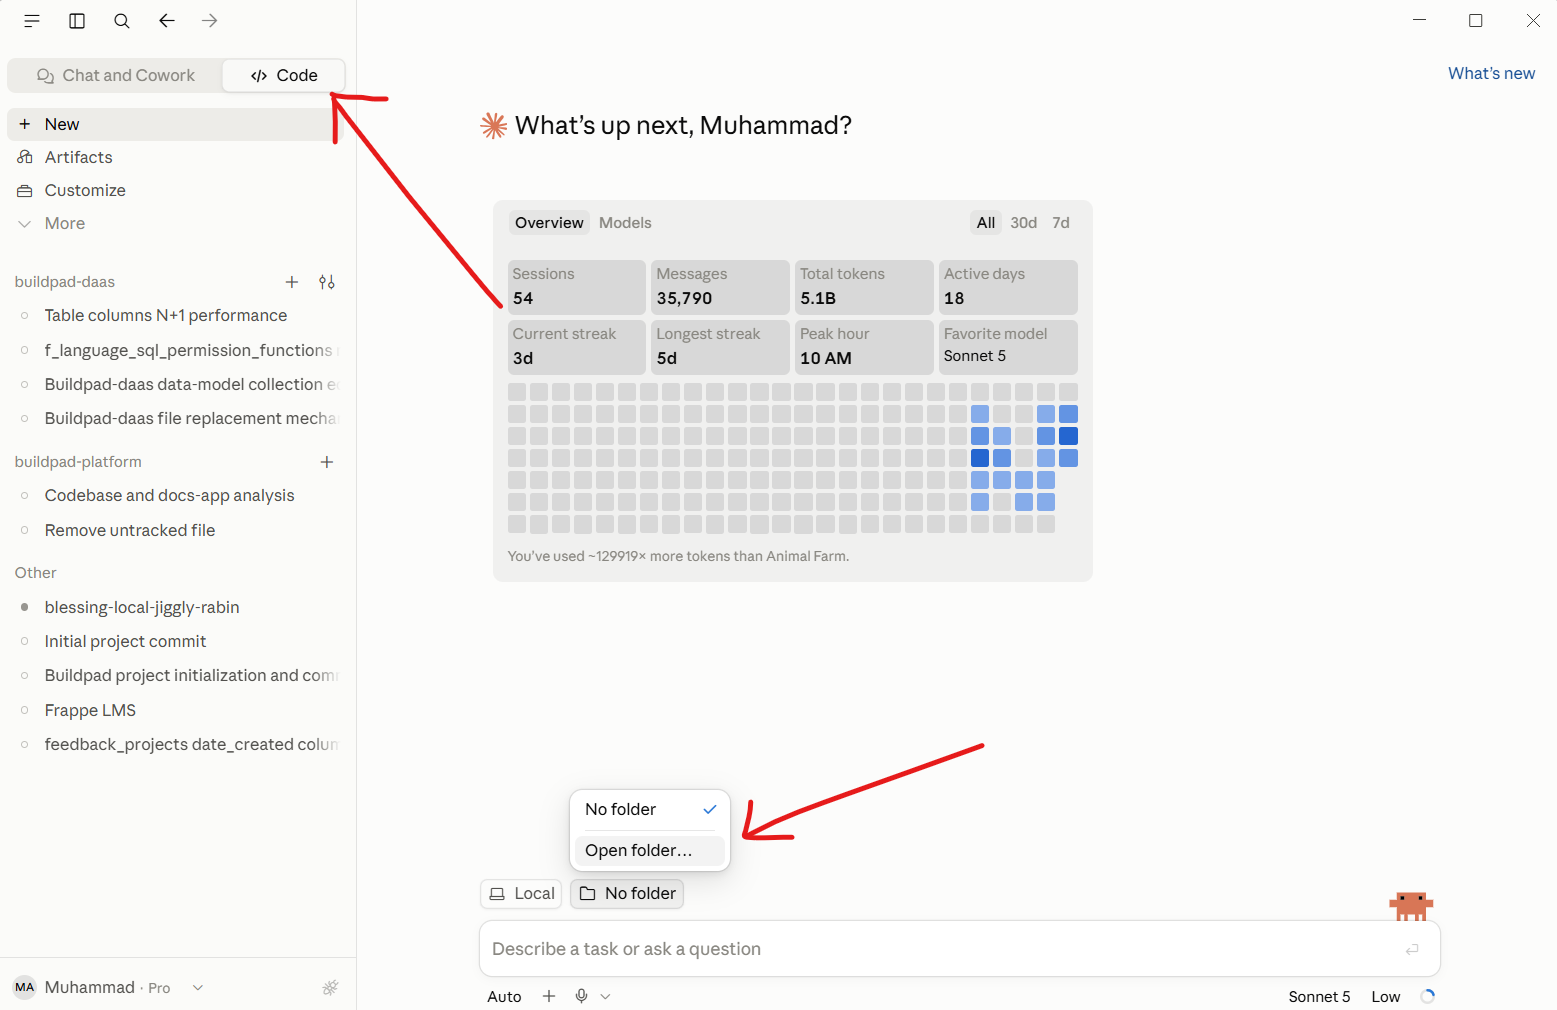
Open Claude and click the Code tab at the top center.
-
Select Local as the environment, click Select folder, and choose the extracted starter project directory.
-
Type
/mcpin the prompt box to open the MCP server list. If thebuildpad,daas, andbuildpad-platformservers appear as pending, approve them there. -
If the servers don’t show up, ask Claude directly in the prompt:
Connect the MCP servers defined in .mcp.jsonClaude Code will register the project servers and request your approval for each one — accept them to activate the backend connections.
-
Run
/mcpagain to confirm all three servers are connected and their tools are available. You can also open the integrated terminal (**Ctrl+**) and runclaude mcp list` to check from the command line.
Terminal (CLI) or IDE extension:
- Open a terminal in the project and run
claude(or open the project in your IDE with the Claude Code extension). - On first run, Claude Code prompts you to review and approve the three servers — accept them to activate the backend connections.
- Type
/mcpat any time to check connection status, or runclaude mcp listfrom the terminal.
If you dismissed the prompt or want to change your choices, run claude mcp reset-project-choices from a terminal in the project and start a new session. This applies to desktop sessions too — desktop and CLI share MCP approval state.
Once connected, the agent can query your database, look up component documentation, and generate code that works with your actual data.
Start Building with AI
With backend connections active, start describing what you want to build — or invoke a skill directly: type / in the prompt box (in the desktop app you can also click + → Slash commands to browse them):
/create-project Design a task management application with teams and projectsAfter the foundation is up, features follow spec-driven development: /buildpad-spec-init → /buildpad-spec-requirements → /buildpad-spec-design → /buildpad-spec-tasks → /buildpad-impl, with a review gate at each step (start with /buildpad-discovery when scope is unclear).
The agent will use the instructions, skills, and backend connections to:
- Create projects — Bootstrap a full Next.js application with DaaS integration.
- Scaffold features — Generate CRUD pages, forms, and API routes from your collection schemas.
- Generate tests — Create Playwright end-to-end tests for your application.
- Manage data — Create database migrations, collections, and set up role-based access control.
- Add UI components — Install and configure Buildpad UI packages for forms, tables, and more.
- Delegate in parallel — Hand reviews, security audits, and test authoring to the bundled subagents while the main session keeps building.
Switching from Another IDE?
Already built and pushed your app with a starter for VS Code, Kiro, or Antigravity? You don’t need to start over — add Claude Code to your existing repository without touching your app code:
-
Open a terminal in your existing app repository — the clone that contains the code you’ve committed and pushed. Check with
git branch --show-current: you should see your working branch (usuallymain). If it saystemporary-local, you’re inside a freshly extracted starter, not your app repo — see the callout below. -
On the AI IDE Setup section of your project’s Details page, turn on “Add to an existing project (agent files only)”, then click Download Starter under Claude Code.
-
The zip contains only the Claude Code agent assets —
CLAUDE.md,.claude/(skills + subagents), and.mcp.json. NoREADME.md, no.env.local, and no.gitdirectory, so extracting it can’t clobber your code, environment, or git history. -
Extract the zip into your repository root and review the new files. Commit
CLAUDE.mdand.claude/, but keep.mcp.jsonout of version control — it embeds your access tokens. If your repository’s.gitignorepredates Claude Code support, add the ignore line first:grep -qx ".mcp.json" .gitignore || echo ".mcp.json" >> .gitignore git add CLAUDE.md .claude .gitignore git commit -m "Add Claude Code agent setup" git push -
Follow Open the Project and Approve the Backend Connections above to connect.
Seeing On branch temporary-local and “nothing to commit”? You’re inside a freshly extracted full starter, not your app repository. Full starters ship with their own .git on a placeholder branch called temporary-local (the /create-project skill renames it to main during bootstrap — pushes to main trigger Amplify deploys, so don’t push it manually), and all Claude Code files are already committed in them, which is why there’s nothing to add. To add Claude Code to your existing app, open a terminal in that app’s clone (or git clone it from your remote first) and run the steps there.
Your existing IDE setup keeps working — the agent files for each IDE live in separate locations, so VS Code, Kiro, Antigravity, and Claude Code configurations can coexist in one repository. The same toggle works in the other direction too: you can add any IDE’s agent files to an existing project.
.mcp.json embeds fresh access tokens, so the starter gitignores it — same as the MCP configs for the other IDEs. Claude Code reads it from disk either way, so backend connections work without committing it. Teammates who clone the repository download their own agent files from the platform to get their own copy.
Updating Skills
The skills in your starter are a snapshot from download time, vendored from the canonical buildpad-ai/skills repository. As Buildpad ships new and improved skills, pull them into your project with the skills CLI — no re-download needed:
npx skills add buildpad-ai/skills --allThe CLI detects Claude Code and writes each skill to .claude/skills/, overwriting the bundled copies with the latest versions. Later on:
npx skills check    # see which installed skills are outdated
npx skills update   # update installed skills
Additional Resources
- Buildpad Agent Skills — The canonical repository for all Buildpad skills, with the full catalog.
- Claude Code MCP Documentation — Learn more about connecting the agent to external tools and data sources.
- Claude Code Skills Documentation — Overview of how agent skills work and how to create your own.
- Claude Code Subagents Documentation — How subagents run focused work in isolated context.
- Claude Code Settings — Full reference for
.claude/settings.json,.mcp.json, andCLAUDE.mdscopes. - Model Context Protocol — The open standard behind backend connections in AI code editors.